Showing posts with label research. Show all posts

Monday, 21 July 2014

Getting Started on our DHFR Project


Time to get to our DHFR project. As we have explained before our aim is to express, purify and do some characterization of DHFR while learning a few things along the way.

In our previous posts, we discussed how to plan a project, identify the key characteristics of your sample and target protein, along with reviewing the key analysis methods to be aware of. We also looked at the thinking around whether you should tag your protein or not and looked at the key/common tags.

With that in mind, a couple of things we need to consider; since we are planning to characterize DHFR using biophysical methods, we are aiming for milligram levels of active protein at a purity of more than 95 %. For our purposes, it would make sense to add a small tag, such as the Histidine tag (unlikely to interfere with our analysis methods and would simplify the purification process). However, since we are doing this to learn and demonstrate how to use protein expression, purification and analysis methodologies and the large variety of tools and techniques, we have (deep breath :) taken the decision to express and purify human DHFR without a tag. Hopefully, this will not be too complicated.

Among the methodologies we plan to use, we have already discussed CIPP – Capture, Intermediate Purification, and Polishing. Another methodology that we plan to use throughout our project is Design of Experiments (DoE). DoE is a structured approach to experimental planning that provides a framework to explore parameters that may influence the outcome of your protocol. It will help you minimize the number of experiments that you have to carry out, while maximizing the information you get out of them in order to improve or optimize your desired outcomes. As it should add logic and structure, we will try to apply DoE to protein expression, purification and any other opportunities that we may come across as our project progresses.

In our experiment, the first step is expression. To express DHFR, we have chosen the most common host, E. coli. There are many different systems that can be used (and we will review the pros and cons of the most common in a future post) but we chose E. coli as it is simple, fast, reliable, low-cost, and easy to get high expression levels (remember we need 95%). One drawback with this host is that there are no post-translation modifications, such as glycosylation. With this choice of host, there is also a chance that we will get our protein expressed in inclusion bodies. While this would require having to refold the protein, it may not be a negative thing for the purification, since the inclusion bodies precipitate and therefore can be easily isolated, plus you get very high purity of your target protein if it is expressed in IBs. 

In our next post, we will look at the gene construct, vector and the cloning of the DHFR expression vector in the E. coli host. 

Meanwhile, if you are interested in learning more about Design of Experiments for protein expression and purification, you can take a look at our handbook.


Friday, 27 June 2014

How to Select the Analysis Methods for Your Protein Project

Proteins can be analysed in a multitude of ways using a plethora of techniques. When it comes to protein purification, there are certain pieces of information about your protein that you are always interested in collecting. Any other aspects you may need to measure are decided by the nature of your research project.

For protein purification, the key pieces of information are identity, purity, size homogeneity, activity and concentration of your target protein (it is also worth trying to get some information about any key impurities as well).

Determining protein purity
Without doubt, the most common technique for determining protein purity is denaturing gel electrophoresis by sodium dodecyl sulfate polyacrylamide gel electrophoresis (SDS-PAGE). This technique separates proteins by size and allows various detection techniques to be used. Classic methods include Coomassie and silver staining, but more and more pre-labeling using a fluorescent dye is gaining in popularity. The classic staining methods use photographic detection using CCD digital imagers (or film if you're lab is old school :) which are robust but less sensitive and quantitative compared to fluorescent pre-labelling.

Alternatives to SDS-PAGE for purity analysis include 2-D PAGE, size exclusion chromatography, and mass spectrometry (Matrix-assisted laser desorption/ionization; MALDI-MS).

Measuring protein identity
The most common technique used for protein identity is western blotting. Western blotting uses denaturing SDS-PAGE gel electrophoresis followed by transfer of the separated proteins to a membrane. These proteins are then detected by a specific antibody and a secondary functionalized antibody which enables detection by chemiluminescence or fluorescence.
Mass spectrometry in combination with reverse phase chromatography, can provide an easy and fast complement or alternative to the antibody-based detection step in western blotting. The main drawback is that you need to have access to a mass spectrometer, a significant piece of kit and often a shared service. The main principle for confirming protein identity using mass-spectrometry is to trypsinate the SDS-PAGE gel band of interest prior to mass analysis. To identify the peptides, Electrospray Ionization (ESI) connected on-line with reverse phase chromatography is common. The mass-spectrum of peptide species after trypsinization provides a unique fingerprint for most proteins, which can be identified using a database lookup.

Use SEC in combination with SDS-PAGE for size homogeneity


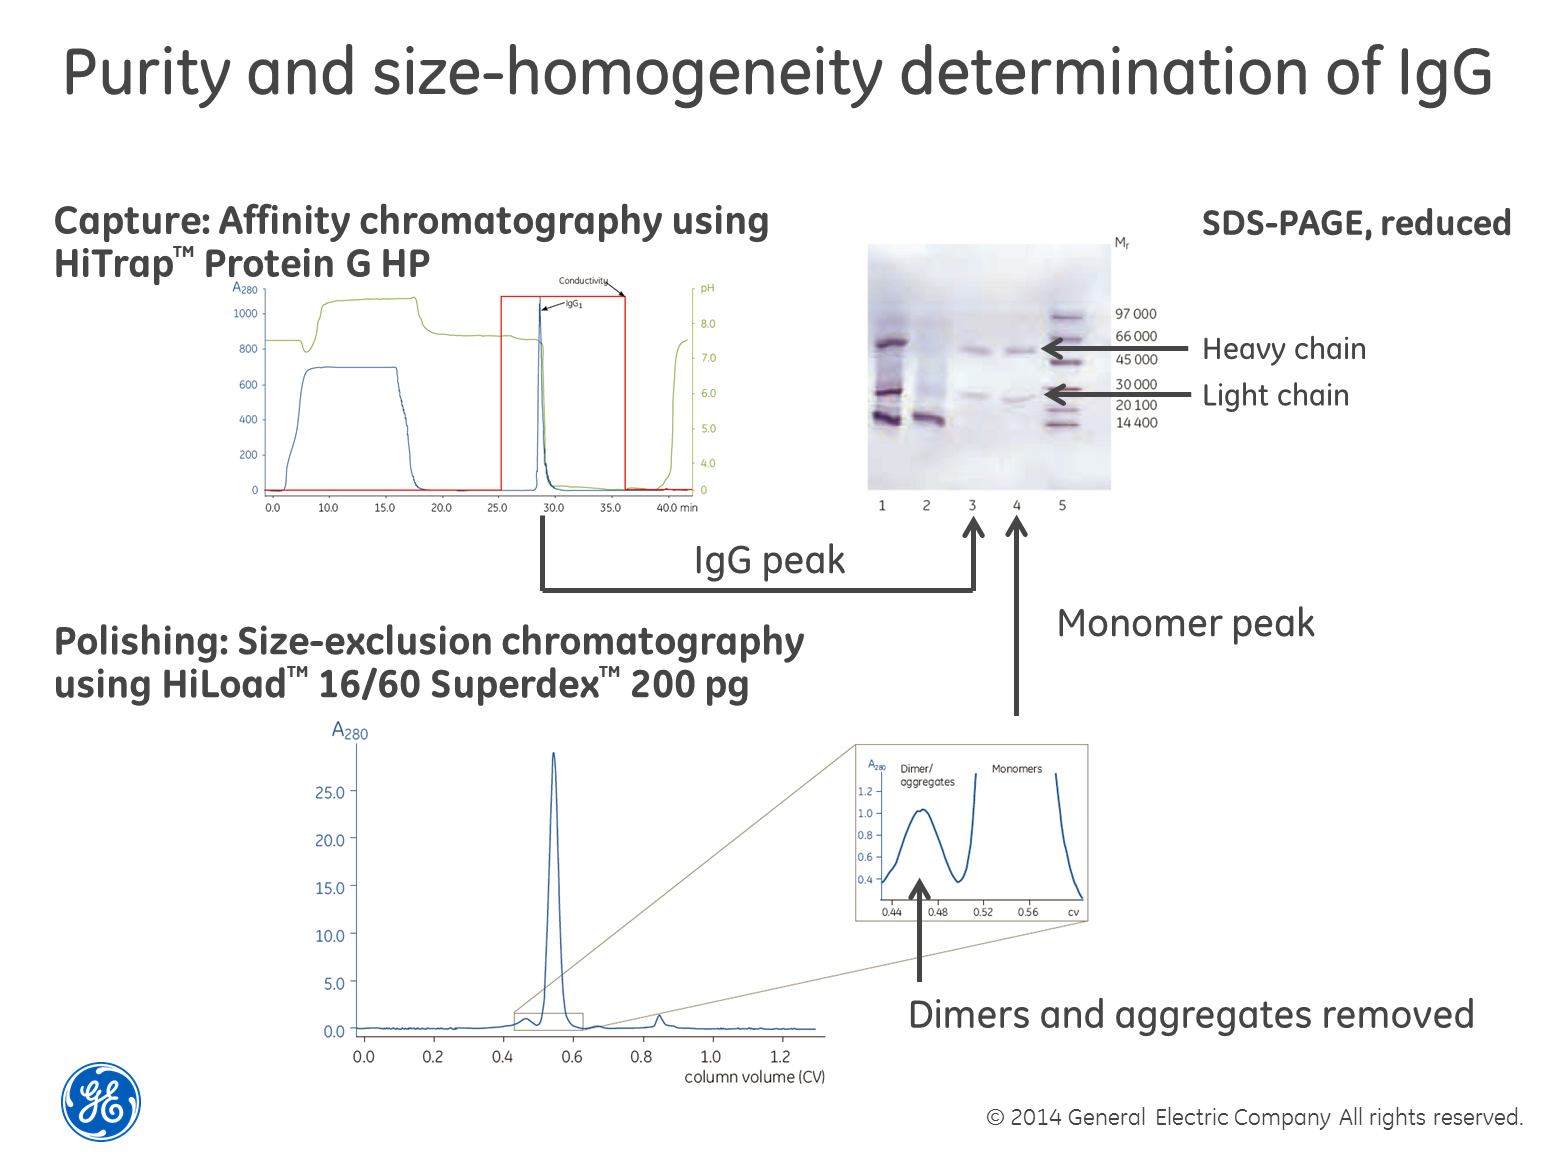
Perhaps the most robust and powerful way of determining size homogeneity is to first separate your sample using size-exclusion chromatography (SEC), collect the fractions and then run a SDS-PAGE gel containing reducing agents such as dithiothreitol (DTT) on the fractions. The reducing agent breaks di-sulfide bridges between cysteine residues and the gel shows single-chain sub-units of the different sizes, if cysteins are causing multimerization. The textbook example is the combined purification and analysis of IgG as exemplified in the image above. The only drawback we can think of with this method is that if you have a low concentration of the protein in your sample, it may be difficult to detect. You also need to choose a SEC column with the right separation range for your protein of course.
Alternatives to this approach include using light-scattering or mass-spectrometry after the SEC step. Again, these detection techniques involve investment in expensive instruments.

Estimating concentration
As the subhead suggests, we think regardless of what measurement technique you use, you are likely to end up with nothing more than an estimation of the concentration. That said, measuring concentration is a chapter of its own (something we’re going to discuss in detail in future posts) but unfortunately no protein concentration assay method exists that is either specific to proteins or uniformly sensitive to all protein types (i.e. not affected by differences in protein composition). It is therefore important to choose the method that is most compatible with the sample and will give enough information for you to move forward with you research. 
For example, one of the most common methods when you want to check the expression level of you target protein from cultivation is to do a rough estimation with SDS-PAGE; it will show if you are on track. If you want to measure the total protein concentration the tried and tested methods are the Coomassie (Bradford) protein assay, BCA protein assay (also known as Smith assay) and UV absorbance at 280nm. 

Each of these methods has its own set of advantages and disadvantages. However, these methods give only an estimation of the total protein concentration. Because no method can be considered the ideal assay method for all circumstances, most researchers have more than one type of protein assay available in their laboratories. The BCA Protein Assay and Bradford Protein Assay methods are complementary and cover most samples, with both based on detection of color change. BCA is a two-step protocol including a Protein-copper chelation and secondary detection of the reduced copper. Bradford is a protein-dye binding and direct detection of the color change associated with the bound dye.

When choosing an assay somethings to consider:

•Compatibility with the sample type and components (e.g. in lysis buffer) that may interfere with the protein and/or the reagents in the assay used

•The concentration range of the assay and required sample volume. For example the Bradford assay works in a concentration range of 125–1,000 μg BSA /ml and the BCA assay in a working range of 20-2000μg BSA/ml

• Protein compositional differences which end up in different amount of color in the final solution and may give wrong concentrations- choose assay and protein standard which will minimise this error

•Speed and convenience for the number of samples to be tested

•Availability of spectrophotometer or plate reader

If your protein is an enzyme with activity in a specific enzymatic assay, using an assay may be an easy way to find out where in your eluted purification fractions the target protein is. You will then be able to detect your protein through all purification steps and have full control of the design of the purification protocol and quality of the obtained preparation. The activity is also an insurance that the protein is obtained in its native state.

We will go through the methods described in upcoming posts when we delve into our DHFR project. 

In the meantime, thanks for reading and if you have any questions let us know via the comments section below.  

Wednesday, 23 April 2014

Getting to Know your Sample


Proteins are a bit like people. People have common structural themes, but there are still differences. Luckily, proteins differ between each other more than people. Purification requires picking out ONE out of many.

Any protein based sample is a complex mixture, containing both the things you want (your protein) and a bunch of things you don't want to have. Before you start to plan the purification protocol it is always a good idea to collect as much information as you can about your sample. Consider characteristics such as


  • Molecular weight
  • Isoelectric point
  • Solubility
  • Stability
  • Known Functions


Knowing these characteristics for your protein and critical impurities (e.g. proteases, proteins or other biomolecules that may bind to your protein of interest, isoforms etc.) will help you to plan an efficient purification protocol, because you can use them for separating proteins from each other..


Proteins differ in the number of charged groups on their surface. They may have hydrophobic parts, affinity tag you have added or some biospecificity for other molecules. They can also vary dramatically in size. All of these properties and insights should be used in the design of the purification protocol.

Using a combination of properties makes purification efficient. This is a cornerstone of the CIPP purification strategy; (CIPP means Capture, Intermediate Purification and Polishing). This is always a good approach when you need to set up a purification protocol for your protein since each chromatography technology has its own limitations (we'll discuss in more detail in a coming post).

DHFR Example

In our DHFR project we hope to show you the thinking behind our choices  as well as sharing the consequences.
So, before we start to plan the protocol for the purification, we need to collect some information about DHFR.

So as suggested we started to plan the purification protocol by collecting some information about DHFR.
The information we found
- it is a single chain enzyme involved in the process for synthesis of nucleic acids (DNA)
- it contains 186 amino acids and only one Cysteine, so there are no disulfide bridges in the structure. 
- the polypeptide folding contains 8 beta sheets connected via 4 alpha helices
- the active site is situated in the N-terminal half of the sequence
- the molecular weight was 21.5 kDa and isoelectric point (pI) pI: 6.9

The pI is important for choosing which ion exchange chromatography technique and which conditions that should be used in your protocol. The size of the protein is important to know to choose a size exclusion chromatography medium with a correct separation range. 

To find the above information about the structure of DHFR we use the data base UniProt/Swiss-Prot as a starting point (http://www.uniprot.org/) we like this resource a lot because it is a hub for much of the information that is known about most proteins. 

Next the interesting part of the analysis (and choosing which methods to use) which we'll discuss in an upcoming post.

Remember the more you know the easier it is to set up your purification protocol and by getting to know your protein and the differences in its structure the better your purification. There are many databases that are excellent shortcuts to gaining valuable information on your protein and if you have some recommendations of your own please let us know via the comments section. 

For more on how to simplify planning & execution of protein purification download our free handbook 


Wednesday, 26 March 2014

The Four Key Factors in Planning Protein Purification

When beginning a new project, where do you start? With a blank page, a bunch of hopes and good intentions? With a protein purification project whatever you do, before you begin, there are a couple of things you always need to consider.

What’s your ultimate goal?
This is the one thing you need to be crystal-clear about: what do you want to accomplish at the end of the project? Do you want to characterize your protein using biophysical methods? Determine the structure using X-ray crystallography or NMR? Use your protein in a functional study? Raise antibodies in a rat or a mouse model? Whatever the ultimate goal, it will decide the quantity of protein needed, the purity and analysis techniques used and these will have a major impact on your planning.


For example with our DHFR project, we’re performing a detailed biophysical characterization including activity and binding studies.

But with any protein purification, there are four key aspects to consider:

1.    Quantity
The quantity of protein needed varies enormously depending on goals. The scale can be from picograms (e.g. for mass spectrometry analysis) to kilograms (e.g. therapeutic proteins). The most common quantities that you will require within a research setting are in the µg to mg scale, for functional and structural studies.

2.    Purity
Again the level of purity required for a protein is intrinsically linked to your goals. To be able to raise antibodies, purities of 90-95% are enough. For crystallography or characterization studies, purity of 99% is often required.

3.    Activity
It is very important to decide whether the protein must be active after purification or not. Protein activity is not important in only a handful of applications; fundamental characterization studies, such as mass determination, amino-acid analysis, etc. Usually in today’s research, and as a rule of thumb, plan to retain the protein’s activity.

4.    Homogeneity
Size or charge homogeneity depends on questions like: is your protein likely to aggregate? What are the consequences for your ultimate goal if it does aggregate? A common pitfall is that a very pure protein sample could be in the form of inactive aggregates; determining if this is acceptable again hinges on the final application.


Fig: an overview of how the scope of a project should be set depending on application

Since our project includes assay development, we need to consider how much protein we have to purify before planning the protocol; so as to avoid low quantities of the protein in any further experiments. (From bitter experience :) many of us have learnt that an under estimate of how much protein you need, can lead to running out of protein half way through or before you have all the results you need. To avoid this, perhaps work in 10s of milligrams at least, as re-doing the experiment takes time and ultimately costs more than the increase in scale.) If you do run out, you may end up having to express and purify more protein and using different batches of purified proteins in the same experiments. This introduces another source of variance and uncertainty when you interpret your results.

So with our DHFR project we aim to purify 10mg quantities at a purity of >95 %, which would be more than enough to perform the activity and binding studies

A couple of tips when planning your project:

  • Try to keep it simple and aim for the purity you need for your experiments, not above that
  • Plan ahead, express and purify enough amount of protein from each batch to cover all experiments in the study
  • Remember the more purification steps you use the more of the protein you will lose
Good planning will make the difference between a successful experiment and one filled with frustration and failure. 
In our next post we'll look at what you need to know about your sample, but in the meantime if you want to share your own tips or have any questions, let us know using the comments/contact boxes below. 

For more on how to simplify planning & execution of protein purification download our free handbook